EUC Access Point Deployment and Config
I was working in my lab this week and decided that I needed to deploy the new EUC Access Point appliance the is available with VMware Horizon 6.2. After a few hours of working with the deployment of the OVF and dealing with the documentation I decided to create this quick deployment and configure guide. Note that this is not a complete how-to, but it should get you on your way.
What is Access Point ?
Access Point functions as a secure gateway for users who want to access Horizon 6 desktops and applications from outside the corporate firewall.
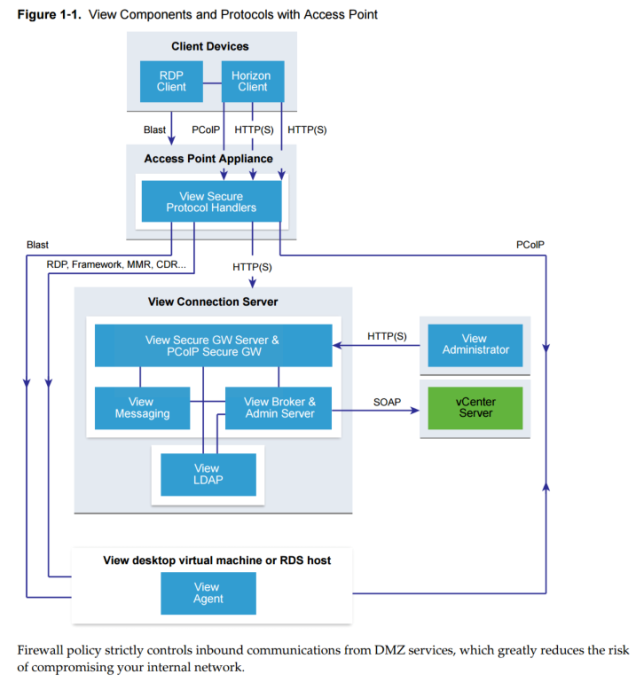
Access Point appliances typically reside within a DMZ and act as a proxy host for connections inside your company’s trusted network. This design provides an additional layer of security by shielding View virtual desktops, application hosts, and View Connection Server instances from the public-facing Internet.
Access Point directs authentication requests to the appropriate server and discards any un-authenticated request. The only remote desktop and application traffic that can enter the corporate data center is traffic on behalf of a strongly authenticated user. Users can access only the resources that they are authorized to access.
Access Point appliances fulfill the same role that was previously played by View security servers, but Access Point provides additional benefits:
- An Access Point appliance can be configured to point to either a View Connection Server instance or a load balancer that fronts a group of View Connection Server instances. This design means that you can combine remote and local traffic.
- Configuration of Access Point is independent of View Connection Server instances. Unlike with security servers, no pairing password is required to pair each security server with a single View Connection Server instance.
- Access Point appliances are deployed as hardened virtual appliances, which are based on a Linux appliance that has been customized to provide secure access. Extraneous modules have been removed to reduce potential threat access.
- Access Point uses a standard HTTP(S) protocol for communication with View Connection Server. JMS, IPsec, and AJP13 are not used
The following authentication mechanisms are available, and for all of these authentication mechanisms except smart card, authentication is proxied to View Connection Server:
- Active Directory credentials
- RSA SecurID
- RADIUS
- Smart cards (Note that for this release smart card authentication is a Tech Preview feature as of 09/08/2015)
- SAML (Security Assertion Markup Language)
Documents and Blogs
Please make yourself familiar with the Documentation located here —> https://pubs.vmware.com/horizon-62-view/topic/com.vmware.ICbase/PDF/access-point-20-deploy-config-guide.pdf
For detailed information on what EUC Access Point is please see Mark Benson’s (Senior Architect and Senior Staff Engineer, End-User-Computing CTO Office, VMware) blog at –> http://blogs.vmware.com/euc/2015/09/vmware-horizon-access-point-secure-remote-access-end-user-computing.html
Connection Flow Diagram
vCenter Web Client Protocol Profiles
If you have read through the documentation you might have noticed that statement about IP Pools on page 17 “If you use the vSphere Web Client, you must also specify the DNS server, gateway, and netmask addresses for each network. If you use the native vSphere Client, verify that you have assigned an IP pool to each network. To add an IP pool, in vCenter Server, go to the IP Pools tab of the data center”. I found that I needed IP Pools / Protocol Profiles for a successful deployment every time wether I used the Web Client or the Windows based client.
IP Pools do not need to be active, but they do need to be defined.
These pre-requisites are covered below
vSphere vCenter Web Client
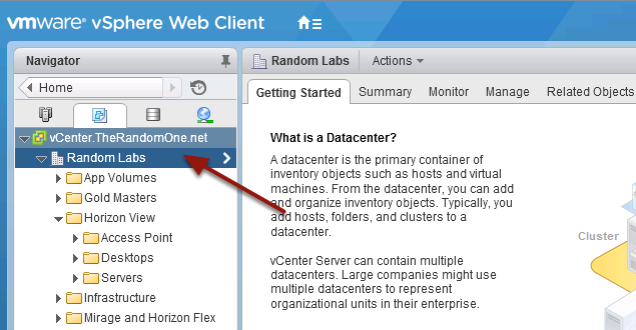
Click on your DataCenter object on the left hand side of the screen.
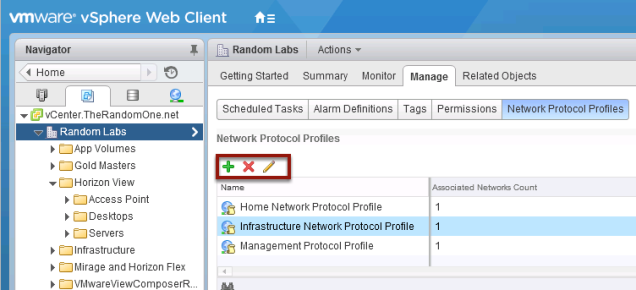
Create / Modify Network Protocol Profiles
- Click on the Manage tab
- then Click on the Network Protocol tab
- Finally Click on the + to add a profile
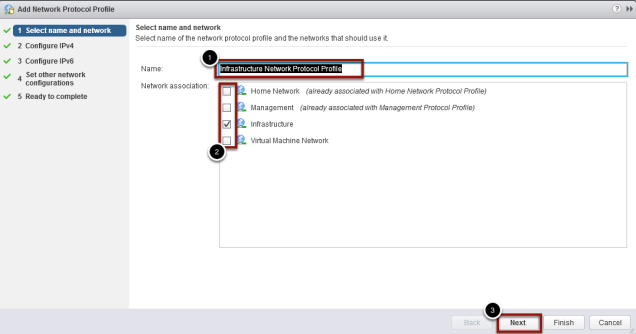
Protocol Profile Name
- Give your Profile a Name
- Make sure to associate your profile with a network(s)
- Click Next to continue
Configure IPv4
- Enter you IP information for this subnet
- Add you default Gateway for this subnet
- If you have a DHCP server available on the associated network then check this box
- Enter you DNS server(s) information
- Click Next to continue
Optional: Enable the IP pool if you do not have a dhcp address or do not define the IP address in the appliance deployment.
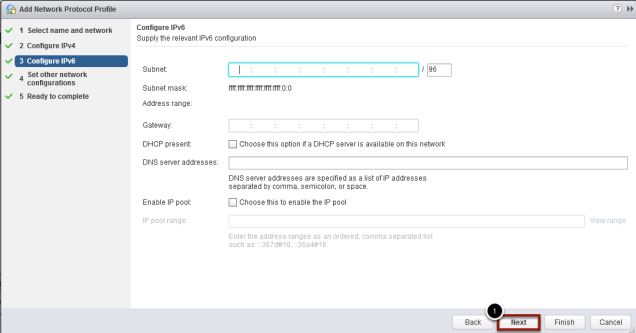
Configure IPv6
If you are one of the few that run IPv6, then you know what details to fill out. I am still and IPv4 guy so I just skipped this step
- Click Next to continue
Network Configurations
- Enter your DNS Domain name (domain.com)
- Enter your DNS search path which is usually the same as your domain
- Click Next to continue
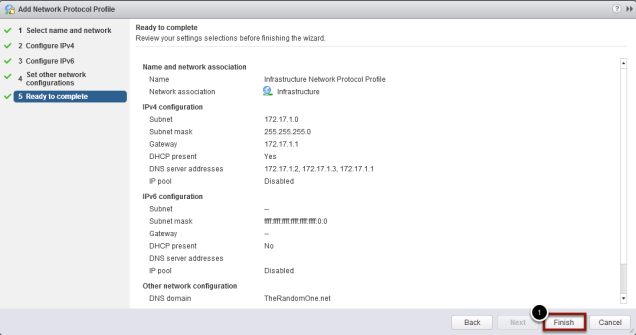
Compete the Profile
Review the information and Click Finish to continue
Repeat the process for additional profiles
Add additional profiles or edit any existing ones
Deploy OVF Template
Hopefully by now you downloaded the EUC Access Point OVF and you are ready to deploy. I will be using the Web Client (yes forcing myself to only use the web client) to deploy and configure the appliance.
vSphere Web Client OVF deployment
- In the vCenter Web Client Right Click on a folder
- Choose Deploy OVF Template…. to start the wizard
Choose the OVF to deploy
- Click on the Browse button for a local file
- and locate your OVF
- Click Open to select that file
Review the OVF details
- Review the information and add a description if you like then Click Next to continue
Select the name and folder for the appliance
- Accept the name or make changes
- Choose your Folder to store the VM
- Click Next to Continue
OVF Configuration Options
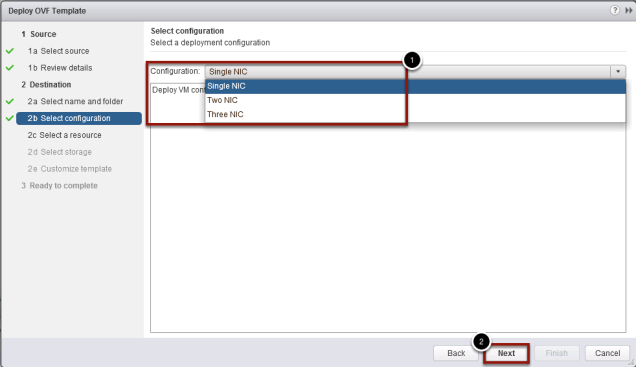
You can use one, two, or three network interfaces, and Access Point requires a separate static IP address for each. This is where the Network Profiles come into play, when defined I have 100% successful deployment, with out them then the percentage has been much much less,
- One network interface is appropriate for POCs (proof of concept) or testing. With one NIC, external, internal, and management traffic are all on the same subnet.
- With two network interfaces, external traffic is on one subnet, and internal and management traffic are on another subnet.
- Using three network interfaces is the most secure option. With a third NIC, external, internal, and management traffic all have their own subnets.
- Choose the deployment configuration options for the number of NICs.
- Click Next to continue
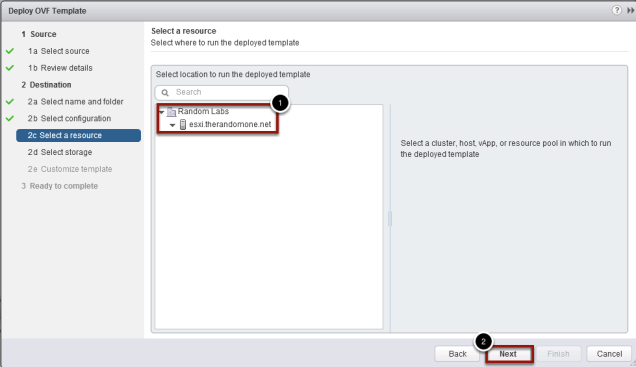
Select a resource
- Choose the resource to deploy the appliance
- Click Next to continue
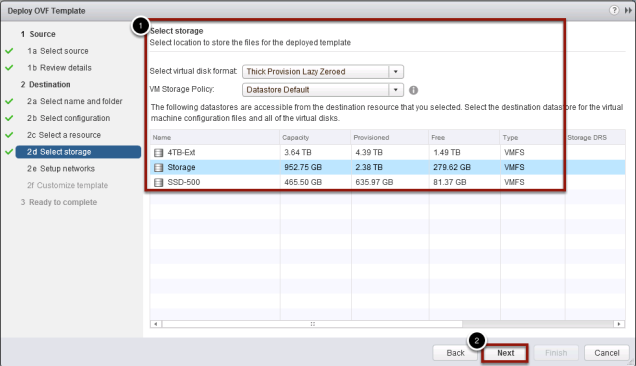
Select storage location
- Select your location to store the virtual machine
- Click Next to continue
Setup the required networks for the OVF
Choosing the network setup is identical if I selected 1 NIC, 2 NICs or 3 NICs but what is different is the subnet that these networks connect.
- Choose a vSwitch/vDS for each network
- Click Next to continue
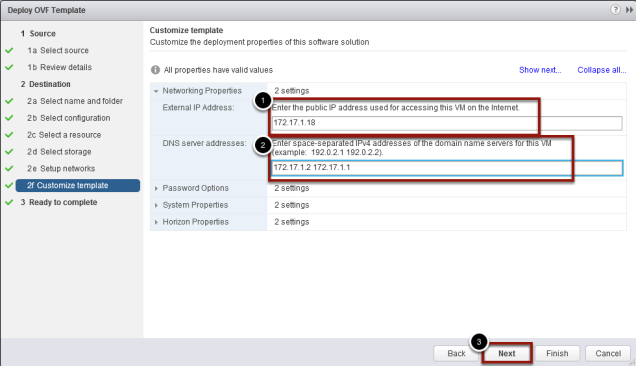
Access Point Network customizations
- Enter your public VIP address or Internet facing IP I will be using port forwarding in my lab.
- Enter the DNS server(s) information for that IP address
- Click Next to continue
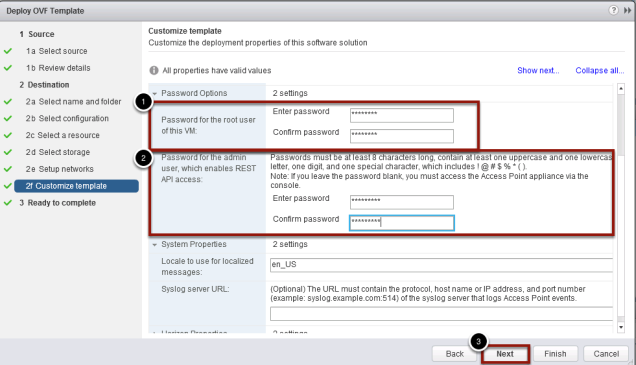
Set the Passwords
- Enter your root password for access to the appliance console
- Enter your password for the admin. This user id and password will be used later to set the configuration using the REST-API
- Click Next to continue
Horizon View Properties
- Under the Horizon Properties you will want to enter the URL to the View connection server or load balancer for those connection servers.
You will also need to enter the Certificate Thumb print…I know, a thumbprint ? You don’t need to google it, the information is below
- Click Next to continue
How do I find a Thumbprint ?
- In your browser, enter the URL of the connection server from the previous screen to expose the certificate
- Click on the lock icon to see the SSL certificate information and
- Click on the View certificates link
Certificate Thumbprint
- When the SSL Certificate dialog opens click on the Details tab
- Then select the Properties Only view in Show:
- Click on the Thumbprint to expose the information
- Select and cntrl-c or copy down the thumbprint information exactly as you see it
- Click OK when you have the information
Enter your Thumbprint
- Enter the certificate thumbprint information in the format found in the previous sha1=(your thumbmprint)
- Click Finish to continue
The Access Point OVF is being deployed
Configure Access Point and Horizon View Connection server for external connections
Once the OVF appliance has been deployed you will need to configure it of external access using the REST-API. I will step you through a quick configuration with a trick or two on how to have this running fast. During this process you might find new respect for the View Security Server deployment, but please step though the whole process and you will find that the Access Point configuration has great potential for mass configuration and updates.
Power On your EUC Access Point appliance
- From the vSphere Web Client, right click on your VM and
- Select Power
- Then choose Power On
Test Appliance Connectivity
Once the EUC Access Point appliance has booted you can test the connectivity between the AP and Connection Server by
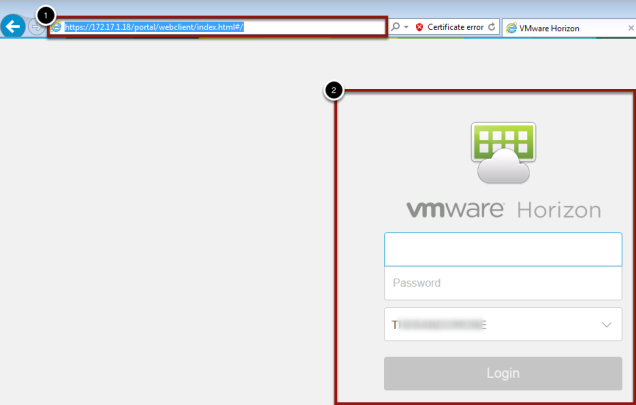
- going to your browser and entering the FQDN or IP address of the public internet facing address that you entered many steps before.
- If the connection is correct you should see the exact screen you would see if you browsed to the connection server you entered in the Horizon properties during the OVF setup. Remember the whole thumbprint search ? This is where the thumbprint comes into play, if you where correct in entering it then you have pass through access. If you where wrong you can either delete and re-deploy (thumbs down) or use the REST-API to modify the connection server url and thumbprint.
REST-API Specification
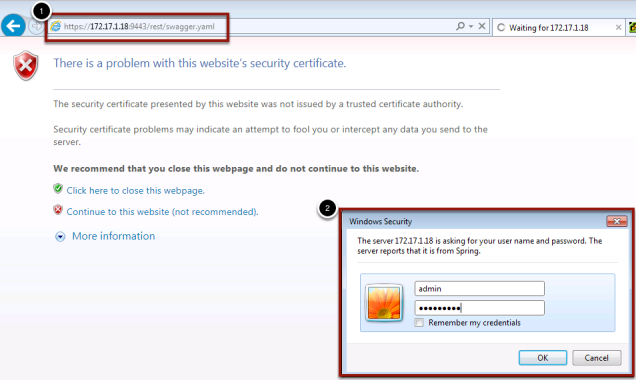
- In a single NIC deployment enter the FQDN or IP address of your EUC Access Point and point to the specification file https://access-pointappliance.example.com:9443/rest/swagger.yaml
- When prompted, enter you admin user id and the password you setup during the OVF deployment
Review the Specification for the REST-API
Your output will be the specification for the REST-API. This along with the documentation will help you create JSON request to modify the configuration….Don’t leave yet, this is not that hard.
cURL access to the REST-API for the appliance current settings
I downloaded a Windows version of cURL, but you can use any OS that supports cURL.
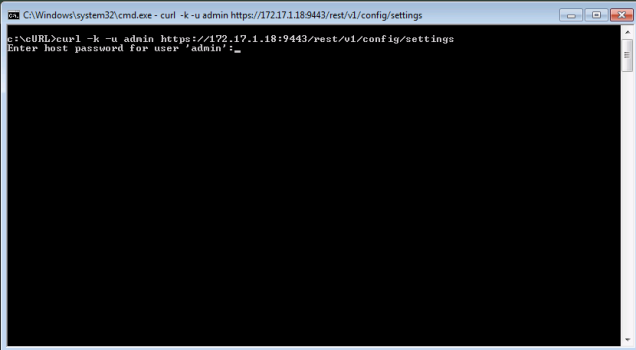
To retrieve the current settings using curl enter the following:
curl -k -u 'admin' https://access-point-appliance:9443/rest/v1/config/settings
This will prompt you for the admin password and retrieve the current settings.
Current Settings
Once you executed the above command you will get the settings returned in raw text.
Fun to read is it not ? Let’s look at another way to read the data.
Postman Chrome Extension
Google Chrome web store has a great extension called Postman. Search for Postman and install the extension
Launch Postman from your desktop
The Postman application was installed to my desktop and I am able to launch it from the Chrome App Launcher or from the browser itself
Postman connection to the REST-API specification
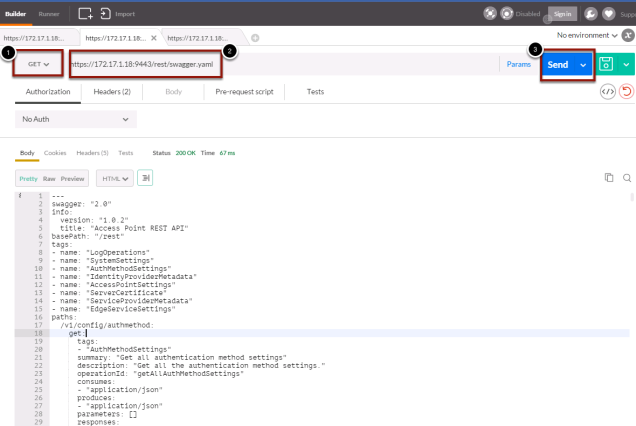
- From Postman, make sure you are set to GET
- Then browse to the https://access-pointappliance.example.com:9443/rest/swagger.yaml url
- Click Send to retrieve the specification
Postman to retrieve current settings
Let’s retrieve the current configuration using Postman
- From Postman, make sure you are set to GET
- Then browse to the https://access-pointappliance.example.com:9443/rest/v1/config/settings url
- Setup Authorization to Basic Auth and enter your admin userid and password
- Click Send to retrieve the specification
The results look much better now and I can actually read the information.
Horizon View Settings including External URLs from Postman
Now if you are familiar with Horizon View you know that we need to set the external url for clients to connect correctly to the security appliance. In the security server case you set those in the GUI in the View Administrator for each Security Server. For Access Point we will retrieve the existing configuration and make modifications to those URLs.
- From Postman, make sure you are set to GET
- Then browse to the https://access-pointappliance.example.com:9443/rest/v1/config/edgeservice url
- Setup Authorization to Basic Auth and enter your admin userid and password
- Click Send to retrieve the Horizon settings
Notice that you have NO external URLs defined ? No client would be able to connect correctly until we define these.
This is where the documentation starts to fall apart for me. We need to create a JSON request to add/modify the required settings. The following step will show us how.
Configure External URL JSON Request using Postman
As stated above. The documentation talks about creating a JSON request and the required settings but they include incorrect syntax
Since we need to define the ExternalURLs for PCOIP, BLAST and Tunnel you will need to add the Key object and value.
“pcoipExternalUrl”: “value”,
“blastExternalUrl”: “value”,
“tunnelExternalUrl”: “value”,
Note that you DO NOT include the HTTPS:// component of the value or your will get an invalid syntax
- From Postman, make sure you are set to PUT
- Then browse to the https://access-pointappliance.example.com:9443/rest/v1/config/edgedservice/view url
- Click on Body tab
- Click the raw radial button and choose JSON (appliaction/json) in the drop down
- Modify your JSON request to include and/or modify existing key objects. Make sure that your ExternalURL is the VIP that your Horizon View clients will connect to. If you are load balancing then this is the most edge address closest to the external client.
- Click Send to set the new configuration
- Review the new settings are correct and modify #5 if they are not.
You are almost there to completing the Access Point configuration for external Horizon View clients
Horizon View Settings including External URLs from cURL
I have not forgot the die hards that love cURL.
You need to create a JSON file that includes the same information we used in the Postman step and save the file to use as an input for cURL.
Since we need to define the ExternalURLs for PCOIP, BLAST and Tunnel you will need to add the Key object and value.
“pcoipExternalUrl”: “value”,
“blastExternalUrl”: “value”,
“tunnelExternalUrl”: “value”,
Note that you DO NOT include the HTTPS:// component of the value or your will get an invalid syntax
Configure External URL JSON Request using cURL
Now that you have you JSON file you will need to send it to the configuration using cURL.
curl -v -k -d @- -u ‘admin’ -H “Content-Type: application/json” -X PUT https://access-point.domain.com:9443/rest/v1/config/edgeservice/view < FILE.json
Notice that you are connecting to the specific configuration and PUTting the contents of that JSON file you created as the new configuration.
Horizon View Connection Server setup for use with Access Point
Browse to your Horizon View Administrator
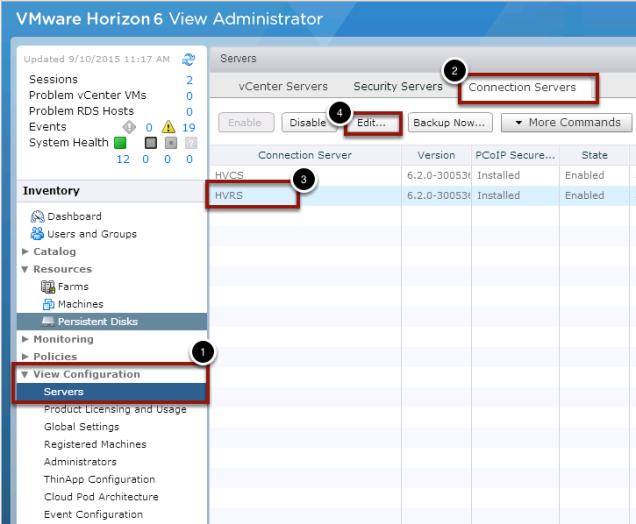
- Click on Servers under the View Configuration
- Click on the Connection Servers
- Choose the connection server(s) that your EUC Access Point
- Click Edit...
Prepare your Connection Server
Unlike the Security Server you need to un-check the External settings since this is handled in the configuration of the Access Point.
Go to the General Tab and make sure to unselect the options.
Note that you can not have a Security Server and an EUC Access Point configured to the same Connection Server.
Setup you external Firewall for access
You are now ready to setup your external firewall or port forwarding to test the connection. Since my lab does not have a static IP address I need to change the ExternalURL for pcoip often. This will now allow me to create a simple script on a Linux VM to check for a WAN ip change and use cURL to update my config. As the EUC Access Point matures it will allow me to front end VMware Identity Manager and other EUC products with out creating several security points. Now to go tackle SSL Certs and 2-Factor Auth















Very good article indeed, I was working through this a couple of days ago and came across the same struggle as you, good tip with the postman though. It would of got my lab up and running a lot quicker 🙂
LikeLike
Thanks for this, beats the admin guide!
How is the IP assigned to the access point appliance?
LikeLike
The external IP address is assigned during the OVF wizard or command line setup. The external facing one is called “Internet” and should be the one your load balancer points to, or the one you clients connect to.
LikeLike
I cannot connect to the appliance through the browser. My appliance is inside my LAN. During the OVF wizard, I give an internal IP for the external IP address. When the appliance boots, it gets a DHCP ip address. I cannot connect to it through browser either using the dhcp ip address or the ip I set as the external ip address. What I am doing wrong?
LikeLike
Let me ask. Is your vCPU for the appliance running at 50%-80% ? If so, then you need to check your Admin password and make sure that it is a strong password. I have seen issues with the bang or ! in the password if it is not towards the end of the string. It might be an escape issue.
LikeLike
My vcpu was running very high. I redeploy the appliance using a strong password without “!”. I still have the same issue. I can log through the console appliance but not using the browser.
LikeLike
What I have seen is anytime you have high cpu on deployment, then the admin password is the issue. Have you seen Chris Halstead’s gui client ? http://chrisdhalstead.net/2015/11/20/vmware-access-point-deployment-utility/
LikeLike